
A pre-sale refresh is different from a renovation because it changes perception more than structure. Paint, light, cleanliness, scale, and obvious maintenance signals usually move buyer confidence far more effectively than expensive construction that is only half-finished by the listing date. The goal is to make the home easier for someone else to trust quickly, not to turn it into the seller's dream version of itself.
The rooms that carry the most emotional weight in photos and showings are predictable: exterior approach, entry, main living area, kitchen, primary bedroom, and bathrooms. The refresh budget should follow that hierarchy. Neutrality matters, but good neutrality is not blandness. It means reducing visual specificity so buyers can project their own life into the space. Overpersonalized styling, bold feature walls, oversized furniture, and crowded shelving all slow that projection down.
Cleaning is often the highest-return line item because buyers use cleanliness as a proxy for maintenance. Professional cleaning of a typical house may run a few hundred dollars and immediately improves grout, glass, trim, vents, baseboards, and every neglected edge sellers stopped seeing years ago. Lighting does similar work: consistent warm bulbs and brighter dark corners make the home feel larger and better cared for. Paint with broad appeal can correct years of color drift faster than almost any other intervention.
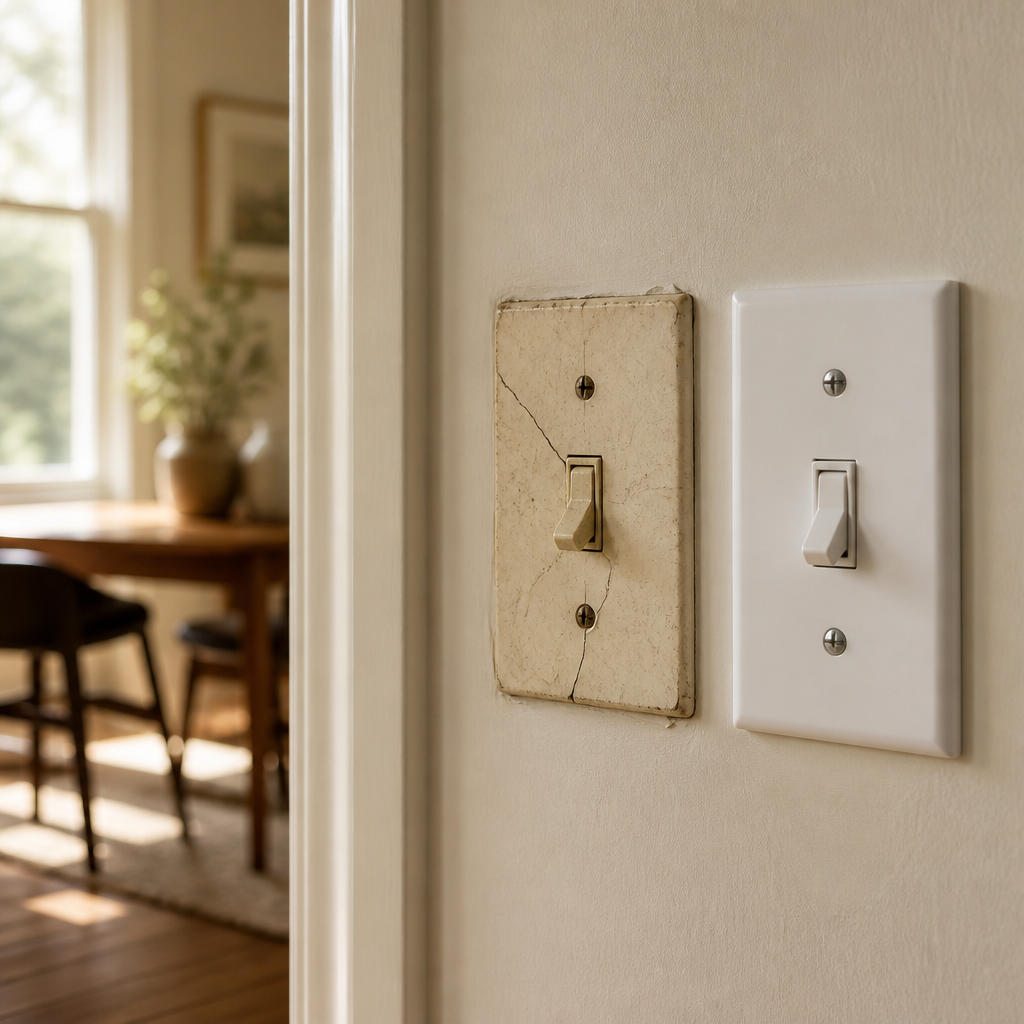
Minor repair discipline matters because buyers rarely isolate flaws one by one. A cracked switch plate, sticky door, tired caulk line, or dripping faucet becomes evidence of bigger problems in their mind. Fresh paint, working fixtures, cleaned grout, and a pressure-washed exterior do more than style alone. The best pre-sale refreshes are scoped with ruthless realism: a few weeks, a few thousand dollars, and a focus on what shortens days on market.
What buyers or guests notice first
Refreshing a home before sale is about removing buyer hesitation faster than the next listing does. That means the work should be judged by first-impression value, not by how emotionally satisfying it feels to the seller. A refresh is different from a renovation because it changes perception more than structure. Paint, light, cleanliness, scale, and obvious maintenance signals usually move buyer confidence much more effectively than expensive construction that is only half-finished by the listing date. The home does not need to become your dream version of itself. It needs to become easy for someone else to trust quickly.
The most influential rooms are predictable: exterior approach, entry, main living area, kitchen, primary bedroom, and bathrooms. Those spaces do the heaviest emotional work in listing photos and open-house movement, so the refresh budget should follow that hierarchy. Neutrality matters here, but good neutrality is not blandness. It means reducing visual specificity so buyers can project their own life into the space. Overpersonalized styling, bold feature walls, oversized furniture, and crowded shelving all slow that projection down. The job is not to erase all character; it is to stop biography from getting in the way of comprehension.

Cleaning is often the highest-return line item because buyers use cleanliness as a proxy for maintenance. Professional cleaning of a typical house may run a few hundred dollars and immediately improves grout, glass, trim, vents, baseboards, and every neglected edge sellers stopped seeing years ago. Lighting does similar work: consistent warm bulbs, working fixtures, and brighter dark corners make the home feel larger and better cared for. Paint with broad-appeal value and decent reflectance can correct years of color drift faster than almost any other intervention. Buyers do not call this out explicitly. They simply call the house "fresh" and move on feeling reassured.
How to prepare the room
Walk through with buyer eyes
Enter through the front door and record your first impression. What do you notice first? What feels dated, cluttered, or neglected? This is what buyers will notice too.
Declutter and depersonalize
Remove family photos, personal collections, and excess furniture. Buyers need to imagine their own lives, not admire yours. Storage units are cheaper than price reductions.
Paint walls neutral
Cover bold colors with warm white, light gray, or beige. Neutral walls reflect light, enlarge rooms visually, and offend no one. Paint is the highest-ROI pre-sale improvement.
Improve lighting throughout
Replace burned-out bulbs, add lamps to dark corners, and maximize natural light. Bright rooms feel larger and cleaner. Dark rooms feel small and neglected.
Stage key rooms
Focus budget on living room, kitchen, primary bedroom, and bathrooms. These rooms drive buyer decisions. Secondary spaces matter only after these are addressed.
Professional photography
Hire a photographer or use high-quality listing photos. Most buyers see your home online before they visit. Poor photos eliminate buyers before they ever walk through the door.
What weakens trust or clarity
Minor repair discipline matters because buyers rarely isolate flaws one by one. A cracked switch plate, sticky door, tired caulk line, or leaking faucet does not stay a small defect in their mind. It becomes evidence. This is why pre-sale refreshes are partly about credibility. The more tiny problems remain visible, the more buyers start mentally discounting what they cannot yet see. Pressure washing, exterior cleanup, pruning, and a stronger front-door presentation do the same trust-building work outside. Curb appeal premiums are well documented, but they are really trust premiums in disguise.
The best pre-sale refreshes are scoped with ruthless realism: a few weeks, a few thousand dollars, and a focus on what shortens days on market or protects price. That focus is what distinguishes productive prep from emotional overspending. A house prepared this way does not necessarily look lavish. It looks clear, maintained, bright, and broad in its appeal. In a competitive market, that is often the difference between a listing that gets discussed and a listing that gets offered on.